The Shared Items page contains all of the links to the items you’ve shared with other users and the links to the items you chose to import. This page is broken into two areas: Published items and Received items.
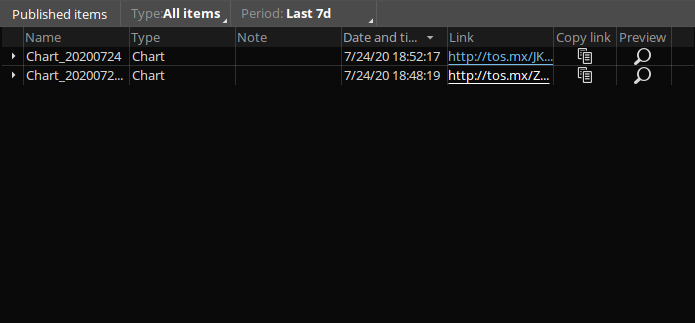
In the Published items area of the Shared Items page, you can find the items you’ve shared. Here is how you can work with the Published items area:
1. Click on the Type dropdown list to select the item types you would like to view.
2. Click on the Period dropdown list to select the period during which you shared your items. The following options are available: all time, last 24 hours, last 7 days, last month, or a custom interval you can specify using the date picker.
3. In the working area of Published items, you will see a table with all the items of the specified type that were published during the specified time period. The following attributes are shown: name, type, note, date and time of publishing, and tos.mx link.
4. By default, the table is sorted by the Date and time column. To sort by another column, click on that column’s header. Clicking again will re-sort by the same column but in the opposite order.
5. By default, all the shared items that have a history of updates are shown in the collapsed mode. To view the history of updates of a shared item, click on the triangle before its name. This will expand the list of updates.

6. You can open a preview for each item in that table by clicking on the ‘magnifying glass’ icon  that appears when you hover over the Preview column. To copy a link to your clipboard, click on the ‘copy’ icon
  in the Copy link column.
7. To remove any item from your Published items, hover over the rightmost cell of that item’s row and click on the Show actions icon that appears. Click Remove to remove an item currently selected or Remove all to remove all versions of the shared item.
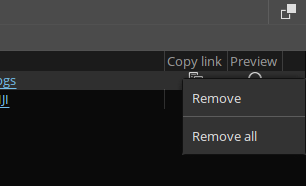
Note: Removing an item from the table will not remove the link to that item. Users who received this link will still be able to access it.
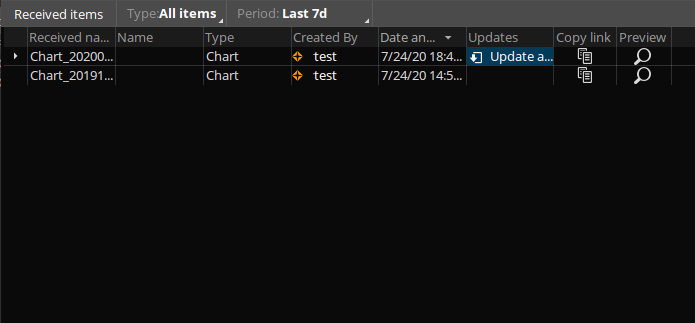
In the Received items area of the Shared Items page, you can find the items that you’ve imported from links shared with you. Here is how you can work with the Received items area:
1. Click on the Type dropdown list to select the item types you would like to view.
2. Click on the Period dropdown list to select the period during which the item was imported. The following options are available: all time, last 24 hours, last 7 days, last month, or a custom interval, which you can specify using the date picker.
3. In the working area of Received items, you will see a table with all the items of the specified type that were imported during the specified time period. The following attributes are shown: received name, name, type, nickname of the user who shared the item, and date and time of publishing. Received name is the name of the item as specified by the user who created it, and Name is the name under which you have imported it.
4. By default, the table is sorted by the Date and time column. To sort by another column, click on that column’s header. Clicking again will re-sort by the same column but in the opposite order.
5. By default, all the received items that have a history of updates are shown in the collapsed mode. To view the history of updates of a shared item, click on the triangle before its name. This will expand the list of updates.
6. If an update is available for an item, you will see Update available in the Updates column. Click on that cell to load the preview for that update. Click Import to import the update; the previous version will then move to the update history. Click Cancel to ignore the update.
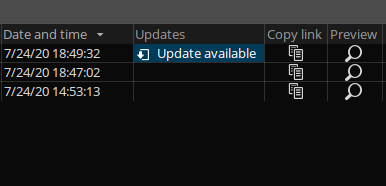
7. To disable updates for an item, hover over the rightmost cell of that item’s row, click on the Show actions icon that appears and choose Disable updates. You will be able to turn on the updates again by choosing Enable updates from the same menu.
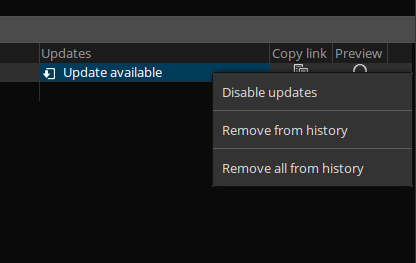
8. You can open a preview for each item in that table by clicking on the ‘magnifying glass’ icon  that appears when you hover over the Preview column. The dialog that appears will also allow you to re-import the item.
9. To copy a link to your clipboard, click on the ‘copy’ icon  in the Copy link column.
10. To remove any item from your Received items, hover over the rightmost cell of that item’s row and click on the Show actions icon that appears. Click Remove from history to remove an item currently selected or Remove all from history to remove entire history for the imported item.
Note: If you remove an item from this list, the underlying item will still be available.
To learn more about sharing in thinkorswim, visit the following page: Sharing.